(An article by John Milligan for NZ Antique Arms Assoc Gazette)
Why Paper Patch?
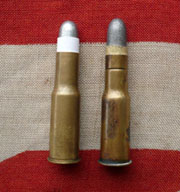
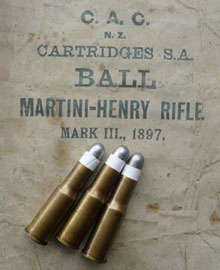
There are few things as attractive as a nice row of Martini-Henry 577-450 bullets all lined up with their new crisp white collars.
In terms of 'range-cred' it separates the 'seasoned campaigners' from the 'newbies' and says 'This guy is really into period-correct shooting!"
It mystifies me why the British Army adopted a bullet that was so time consuming to produce. In America during the reign of the Martini-Henry the military were using 50-70 and 45-70 ammunition in their Trapdoor Springfields and Remington Rolling Blocks. They simply used a greased, over bore-sized projectile shoved into a straight walled case. No bottle-neck and no paper patch. And they shot bloody well!
Those who did use paper patching at the time tended to be match shooters or buffalo hunters who built their own ammunition. So the paper patched bullet had something of a reputation for greater accuracy. But many latter-day experts believe that the best paper-patched bullets and the best grease-groove bullets are about as accurate as each other.
It has been claimed that the paper patch enables a better fit between the rifling and the bullet. And that it serves as a gas check while at the same time sweeping fouling before it and stopping the build up of lead on the bore. Or that it prolongs barrel life. All of these points are debatable.
The only non debatable point is – It looks bloody good!
The Load
This short article is mainly about what goes around the bullet, not what goes beneath it, so most of it is applicable to calibres other than the M-H 577-450. But for the record, the load I use for M-H 577-450 is (from the bottom up): Magnum primer- Gives better ignition for large volumes of powder.

- 85 gr FFg Black powder – I use GOEX when I can find it or afford it.
- 1 x wool wad filler – (From Cast Bullet Kid)
- A waxed card wad – punched from a milk carton
- Approx 3/16 grease cookie – made of 50/50 liquid alox/beeswax
- Another waxed card wad
- The paper patched bullet. (.458 cal 480 grain wheel weight)
This is a fairly good modern equivalent of the standard military load.
The Projectile
The original paper patched bullets used a projectile that was smooth. That is, it had no cannelures (or grease grooves). They also had a small cavity in the base to accommodate the twisted end of the paper patch. Moulds for these bullets are available but they are quite expensive. So I prefer to use flat based grease groove bullets cast from the moulds I use for my 45-70. This works out well because they are .457 to .458.
Martini-Henry Mks I to III ( 1871 – 1887) tend to have a groove depth of about .465 to .467. The MK IV 'Long Lever' model ( 1887 onwards)has a groove depth of .470 to .472. So with the right thickness of paper I can patch my bullets up to groove depth plus or minus a few thousandths of an inch. If you patch them more than a couple of thousandths of an inch above groove size you risk patch tearing and bore leading.
Some contributors to internet forums insist that the original paper patched bullets were patched up to bore size. This might be correct for some makes of gun but not for the Martini-Henry.
These are the original specifications:
Original Specs.
Bullet Diameter (Naked)
Bore Diameter
Groove Diameter
Patched Diameter
Patch thickness (4 layers)
Paper thickness
M-H Mk I – III
0.452
0.449
0.465-0.467
0.465 – 0.468
0.013 – 0.016
0.00325 – 0.0004
M-H Mk IV (Long Lever)
0.452
0.453
0.470 -0.472
0.470 – 0.473
0.018 – 0.021
0.0045 – 0.00525

Already you'll see that the naked .452 bullet is bigger than the bore diameter of the MK I to III. And any patch over 0.001 is going to make the bullet bigger than the Mk IV bore. As far as I am concerned, if you are only going to patch the bullet to exactly bore size, you might as well muzzle-load it.!
It's interesting to note that the only difference between the projectiles for the Mk I to III and the bigger bored Mk IV was the thickness of the patch.
The original paper patched Martini-Henry bullets used a composition of 12 parts lead to one part tin. If you don't want to bother mixing up that alloy, just use wheel weights which are slightly harder but will still work well.
The advantage of a softer alloy is that if your patched projectiles are slightly under groove size they will 'slug up' to groove size when the explosion happens.
Choosing Paper Quality
Try and find 'BOND' paper which is a relatively high grade paper generally used for letters, business forms, and copying. Some types of bond paper may have a rag content ranging from 25 percent to 100 percent. I am told that the old pre-decimal currency bank notes are perfect for paper patching!
Choosing Paper Thickness
If I am patching a .458 bullet to use in my MK IV Martini with a groove depth of 0.470 I need to make up a difference of 0.012.
Since the paper will be going twice around the projectile it will add 4 thicknesses of paper. So I need paper that is a quarter of 0.012.
I know by measuring with digital callipers that 80 Gsm (Grams /sq metre) is 0.004. Multiplied by 4 that gives 0.016.Add that to the projectile diameter of 0.458 and you get 0.474.Admittedly that is over groove size but patches collected from down range show that the paper patch survives the scary ride down the rifling quite well.
I find that, after firing (and cooling down!), my Martini shells have a throat diameter of 0.474. So if I paper patch the bullet to .474 (instead of 0.470) then it will fit the shell perfectly without the need to resize or crimp the neck. But this is just a happy coincidence. Others might have to crimp the case necks.
The Right Shaped Patch

This is best ascertained by using a piece of the paper you have selected and cutting it to fit. In terms of width, the patch needs to extend up towards the nose of the projectile until it is slightly past the area where the nose starts to curve to a point. (Or where the 'ogive' begins). This is so it will be sure to feed into the throat of the chamber.
At the other end of the projectile the paper must be folded and twirled under the base. It is best if there isn't any excess to trim – particularly so with flat based bullets because you don't have a hollow base in which to shove the excess.
Also, the bullets won't balance on their bases when you leave them standing overnight to dry.
In terms of length, the patch must wrap twice around the bullet.
The place where the ends meet should be cut at an angle. Some pundits say 45 degrees, some say 60. But I don't think it matters that much.
 Another point to consider is which way you wrap the paper. Should it be clockwise or anti-clockwise? (Looking from the rear of the projectile).
Some say this depends on the direction of twist of your rifling.
For example if, looking from the breech end, your rifling has a right-hand or clockwise twist, you should wrap the patch in an anti-clockwise direction so that it is tightened as it enters the bore. Personally I think that once the patched projectile is engaged in the rifling there is no way it is going to unravel. But I still follow that rule – just to be sure….
Another point to consider is which way you wrap the paper. Should it be clockwise or anti-clockwise? (Looking from the rear of the projectile).
Some say this depends on the direction of twist of your rifling.
For example if, looking from the breech end, your rifling has a right-hand or clockwise twist, you should wrap the patch in an anti-clockwise direction so that it is tightened as it enters the bore. Personally I think that once the patched projectile is engaged in the rifling there is no way it is going to unravel. But I still follow that rule – just to be sure….
Remember that when you apply your patch it will be wet and will stretch a bit.
So the ends might overlap rather than butt up against each other. So trim it back a millimetre or so. Of course when they dry they retract so it's pretty hard to end up with the two ends meeting perfectly. So I just do my best and let it be.
Once you are happy with the shape, make a brass template.
How To Make A Brass Template

This is easy. Just go to your local modelling shop and buy a small piece of brass sheet. It is easily cut by using your wife's best sewing scissors but is best done when she is out. Now you can mass produce patches by cutting several at a time. Some people like to take a snip off one of the pointy ends of the template which gives them an alignment point so that they know there will be exactly the right amount of overhang on the base end, and that the patches will all reach the same height on the other end of the projectile. It's a good idea to stamp or scratch the brass template to identify which bullet it relates to.
Rolling Your Own
First wet your patch by dipping it in a bowl of water. Some sources recommend adding a bit of flour to the water to help the patches stick. But I haven't found this necessary. Besides, as soon as the paper wrapped projectile leaves the bore I want the patch to fall off easily. I think it is better not to pre-wet a lot of patches as they get too soggy. It's better to wet them as you go. They only need a few seconds in the water.
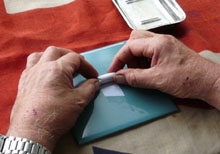
It's best to work on a smooth water-proof surface.
 Make sure the patch is correctly located. Then it is a case of rolling it along the work surface so that you are tightening the patch as you roll. (It's a bit hard to describe but you'll get the hang of it.)
Remember to roll them clockwise or anti-clockwise (looking from the base end) depending on the direction of your rifling. (You want to go the opposite to the direction of the rifling.)
Next, twirl the paper that overhangs the base against your thumb. Then press it onto the work surface to make it nice and flat.
Set the finished bullets on their bases and leave them to dry overnight.
Make sure the patch is correctly located. Then it is a case of rolling it along the work surface so that you are tightening the patch as you roll. (It's a bit hard to describe but you'll get the hang of it.)
Remember to roll them clockwise or anti-clockwise (looking from the base end) depending on the direction of your rifling. (You want to go the opposite to the direction of the rifling.)
Next, twirl the paper that overhangs the base against your thumb. Then press it onto the work surface to make it nice and flat.
Set the finished bullets on their bases and leave them to dry overnight.
Lube
Some books say that you should not lube paper patched bullets but others say firing dry paper patched bullets down your bore will soon hone it out to a bigger calibre. The original Martini-Henry ammunition was loaded with dry patches but there was a beeswax disc below the bullet which coated the bore with wax on firing.
 When shooting black powder it is best to keep the fouling moist – so I lube my paper patched bullets. I simply dip them into melted Beavergrease™ (or similar) so that the lube goes far enough up the projectile to cover the part that will be held by the case.
Sometimes you'll find when you come to fit them to the case mouth the bottom edges will have splayed out while they sat drying. So I just twirl them in some conical shaped object to 'chamfer' them before I dip them in the lube.
When shooting black powder it is best to keep the fouling moist – so I lube my paper patched bullets. I simply dip them into melted Beavergrease™ (or similar) so that the lube goes far enough up the projectile to cover the part that will be held by the case.
Sometimes you'll find when you come to fit them to the case mouth the bottom edges will have splayed out while they sat drying. So I just twirl them in some conical shaped object to 'chamfer' them before I dip them in the lube.
The excess lube shaves off when you push them into the case. Remember to wipe off all the excess from around the neck of the case.
Instinct told me not to lube and load the projectiles too far in advance of a shoot in case the lube weakened the paper over time. So I did a test by dipping the paper in Beavergrease™ and leaving it for a month. After that time, the paper was no easier to tear than when fresh. So it is important to use compatible paper and lube.
I have seen one shooter in competition who lubed the paper patch just prior to firing by rubbing wet lube on with his fingers. But don't use your trigger finger!
Some Philistines even use a spray-on silicone dry lube. If you're that way inclined, you've probably missed the whole point of making period ammunition and shouldn't be allowed to mess with precious old bangers. Go buy a Norinco!
Seating
If, when you come to load them they are a bit tight then twist them as you insert them. But remember to twist them in such a direction that the paper doesn't unwind. Make sure to seat them at a uniform depth.
To Crimp or Not To Crimp
Logic tells me that too tight a crimp might damage the paper patch as it exits the case. So I just put the completed round in a standard reloading press and shove it about 4mm up a 45 Colt or 455 Webley die. This gently squeezes the neck ever so slightly. But there is a school of thought (champion paper patch shooters amongst them) that believes you should never crimp cast bullets. They say the only reason to crimp cast bullets is if they are being used in a tube magazine rifle where recoil might cause one bullet to push in the projectile behind it. Or, if you are shooting a revolver where recoil might make a projectile jump forward and stop the cylinder revolving. Then there are those who say black powder ignites better if it is restrained for a split second before it is allowed to expand. So who really knows? The only way to know for sure is to try it!
What If You Don't Have a Martini-Henry?
Don't worry. You can still be a paper patcher!
I've read numerous articles where hand-loading geeks have even used paper patches on copper jacketed bullets powered by smokeless powder.
They have been able to get an amazing improvement in performance from old worn military rifles or from old rifles for which it is impossible to get the right sized copper jacketed projectile.